N-Button Lite/Pro software allows you to control Web-i relay module without any programming!
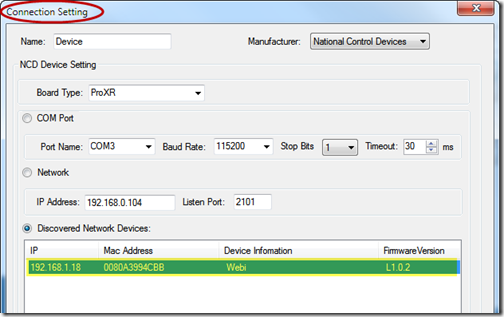
Once the web-i relay module is connected, the information will be list automatically in N-Button Lite/Pro.
To send HTTP request, you need create a Customized Button. Here are the steps.
1. Click “Customized Button” on N-Button Lite/Pro Manager to show its Properties panel.
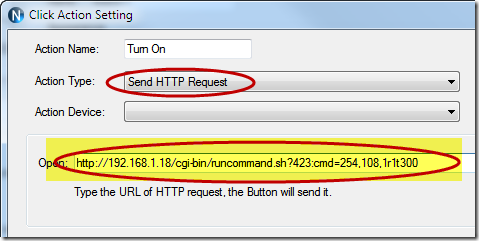
2. Click “Setting” on “Properties – Customized Button” to show “Click Action Setting” panel.
3. Select “Send HTTP Request” for Action Type and input the HTTP Request.
Here, the Action Device can be ignored, because the Web-i relay module is connected to network, which can be accessed by all computers in same network. If you want to send HTTP request to the Web-i relay module from several different computers, be sure not connect the Web-i module with one computer. It should be connected with a router.
The HTTP Request includes the command to control the Web-i relay module. Here is the format for HTTP request to control Web-i relay module.
http://[webi_ip]/cgi-bin/runcommand.sh?[random number]:cmd=[command]r1t300
webi_ip: IP address of web-i relay module.
command: control command
For example: http://192.168.1.18/cgi-bin/runcommand.sh?423:cmd=254,108,1r1t300
The IP address can be found in “Connection Setting” panel just like we mentioned above. You also can find it on your router setup page.
About the command, here “254, 108, 1” is the command to Turn On relay. The “1” indicates the Bank Number. If the Web-i relay board has relays less than 8, the board has only 1 bank. The bank number will be 1. Each bank have 8 relays. If the board has more than 8 relays, there are more banks on the relay board. Relay 9th to 16th belongs to Bank 2, relay 17th to 24th belongs to Bank 3. etc..
Here are some frequently used commands. You can get more commands from related manual of relay board.
| Relay | Turn OFF Command | Turn ON Command |
| Relay 1 | 254, 100, 1 | 254, 108, 1 |
| Relay 2 | 254, 101, 1 | 254, 109, 1 |
| Relay 3 | 254, 102, 1 | 254, 110, 1 |
| Relay 4 | 254, 103, 1 | 254, 111, 1 |
| Relay 5 | 254, 104, 1 | 254, 112, 1 |
| Relay 6 | 254, 105, 1 | 254, 113, 1 |
| Relay 7 | 254, 106, 1 | 254, 114, 1 |
| Relay 8 | 254, 107, 1 | 254, 115, 1 |
| Relay 9 | 254, 100, 2 | 254, 108, 2 |
| Relay 10 | 254, 101, 2 | 254, 109, 2 |
| Relay 11 | 254, 102, 2 | 254, 110, 2 |
| Relay 12 | 254, 103, 2 | 254, 111, 2 |
| Relay 13 | 254, 104, 2 | 254, 112, 2 |
| Relay 14 | 254, 105, 2 | 254, 113, 2 |
| Relay 15 | 254, 106, 2 | 254, 114, 2 |
| Relay 16 | 254, 107, 2 | 254, 115, 2 |
| Command | Description |
| 254, 129, 1 | Turn Off all relays in Bank 1 (Relay 1 to Relay 8) |
| 254, 130, 1 | Turn Off all relays in Bank 1 (Relay 1 to Relay 8) |
| 254, 131, 1 | Invert all relays in Bank 1 (Relay 1 to Relay 8) |
| 254, 129, 2 | Turn Off all relays in Bank 2 (Relay 9 to Relay 16) |
| 254, 130, 2 | Turn Off all relays in Bank 2 (Relay 9 to Relay 16) |
| 254, 131, 2 | Invert all relays in Bank 2 (Relay 9 to Relay 16) |
| 254, 140, 0-255,1 | Set Status of all relay in Bank 1. |
4. Click “OK” on above panels to create the button to Turn On Relay 1.
5. Turn Off Relay 1 button can also be created with the same way. The HTTP request should be,
http://192.168.1.18/cgi-bin/runcommand.sh?423:cmd=254,100,1r1t300
By sending HTTP request, you can control your web-i relay board with any computer connected to the same network.


