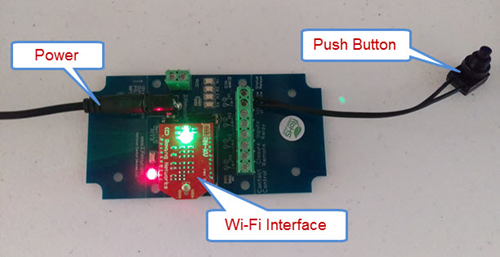
N-Button Lite/Pro software Automation feature allows you to control relay channel by push notification contact closure board of National Control Devices. That means you can set up Automation rule to match input channels of push notification board with relay channels on relay board. The relay status will be changed when the input channel status changes.
Here will show you how to set up N-Button Lite/Pro software to toggle a relay channel by push notification input channel.
Task: Trip input channel 1 to toggle relay channel 1
Step 1. Download and install N-Button Lite or Pro software
Step 2. Connect push notification board of National Control Devices and relay board with your computer. (N-Button supports relay boards from National Control Devices, Robot Electronics and Velleman)
Step 3. Run N-Button Lite/Pro software. Click Devices Manager –> New to add push notification board and relay board to Devices Manager.
Click the link below to get more information about how to set up push notification board with N-Button Lite/Pro.
- Set up USB Push Notification Board with N-Button
- Set up Wi-Fi Push Notification Board with N-Button
- Set up Ethernet Push Notification Board with N-Button
Step 4. Click Scan Channel to open Properties – Scan Channel. Select Device MyPushNotificationBoard added above, keep Bank ID 1, select Channel ID 1, select Style for Scan Channel widget.
Step 5. Click OK on both above panels. You will see the Scan Channel widget showing on your desktop is Red.
Trip input channel 1( or press the push button connected with input channel 1), you will see the Scan Channel widget on your desktop turns to Green. Release the button, the widget turns to red again. That indicates the push notification board works well with N-Button.
Step 6. Add a Relay Button widget for relay channel 1. It’s similar as Step 4. Just be sure you select Device – MyRelayBoard, Action – Toggle One Relay, Bank ID –1, Relay ID –1, select the Style which will show relay status.
Step 7. Click the Relay Button widget on your desktop to turn on/off relay. The relay status will be shown on the button, green for on and red for off. That makes sure the relay board works well with N-Button also.
Note: Here, only one Relay Button is added with action Toggle One Relay. You can add two buttons, one for Turn On One Relay, another for Turn Off One Relay. You can also add Relay Status widget just show the status of relay channel 1.
Step 8. Right-click on the Scan Channel widget to show pop-up menu, click N-Button Lite/Pro Manager to open the manager panel. Click Automation on N-Button Lite/Pro Manager to open Automation Manager. Click New to show Rule Type panel. Click Push Notification Contact Closure Rule to open setting panel.
Step 9. Click the first Setting button to select Device – MyPushNotificationBoard, Bank ID 1 and Channel ID 1, which you will use to toggle relay channel 1.
Step 10. Click the second Setting button to select:
- Action type –Relay Action
- Action Device – MyRelayBoard
- Control Action – Toggle One Relay
- Bank ID – 1
- Relay ID – 1
Step 11. Click OK on all above panels to finish Automation control setting until you see the Scan Channel widget on your desktop.
Now, you can toggle relay channel 1 by changing input channel 1 status( push the button to change its status) . If relay 1 is off, it will turn on after you push the button. If relay1 is on, it will turn off after you push the button.
- Note: Step 10 is the key to select the action trigged by input status change. You can select different action to meet your requirement.
See Also:
N-Button Automation Application – Send Text Message
N-Button Automation Control Relay by A/D Input
N-Button Automation Control Device with Key Fob
Light Control with N-Button Automation Time Point Rule
Light Control with N-Button Automation Schedule Rule
N-Button Automation Control Device with Conditional Rule
N-Button Automation: Send Data with Push Notification Board
N-Button Automation: Trigger Relay with Push Notification Board
N-Button Automation: Control Relay with Push Notification Board
N-Button Automation: Interval Turn On Relay by Push Notification Board


![image_thumb[17] image_thumb[17]](http://www.serialporttool.com/sptblog/wp-content/uploads/2016/12/image_thumb17_thumb.png)


