|
How To Use Quick Timer
Set COM Port
In order to control your device with Quick Timer, be sure to connect NCD relay board with your computer and connect your device with NCD relay board at first, then set the port as below.
Click  button to open the Configuration dialog. button to open the Configuration dialog.

Select Port Name and Baud Rate.
Click OK to finish setting.
Turn On/Off Relay Manually
The light on top right of relay control panel indicates the status of the relay. Red is for relay on. Green is for relay off.
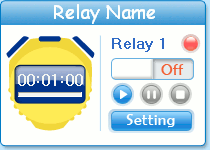
Only in manual mode, the switch  is avilable. is avilable.
Click the slider to turn on the relay. The light becomes green.
Click the slider again to turn off the relay. The light becomes red.
Turn On/Off Relay Automatically
The relay must be set before it step into auto mode.
Click Setting button on the relay control panel to open Relay Setting dialog.
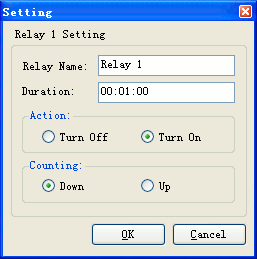
Input Duration, select Action and Counting mode.
Click OK to finish relay setting.
Click  button to start auto mode. The relay will work according to above setting automatically. button to start auto mode. The relay will work according to above setting automatically.
Click  button to pause auto mode. The status of relay can be controlled manually now. button to pause auto mode. The status of relay can be controlled manually now.
Click  button to stop auto mode. The status of relay can be controlled manually now. button to stop auto mode. The status of relay can be controlled manually now.
Rapid Buttons
|
Click to set all relays in auto mode. |
|
Click to pause all relays in auto mode. |
|
Click to stop all relays in auto mode. |
|
Click to turn all relays on. |
|
Click to turn all relays off. |
|
Click to invert all relays. |
|
Click to load a *.tmr file to get time settings of all relays. |
|
Click to save time settings of all relays to a file (*.tmr) |
|
Click to load a *.sat file to set status of all relays. |
|
Click to save current status all relays to a file (*.sat) |
|
Click to open Configuration dialog. |
|
